Connect with us

Blog

Internal Temp Of Corned Beef

Published

on

internal temp of corned beef

Cooking corned beef correctly requires more than just following a recipe; understanding the internal temp of corned beef is critical for both safety and texture. Achieving the right temperature ensures that harmful bacteria are eliminated while the meat remains tender and flavorful. Without monitoring internal temperature, even well-prepared corned beef can turn out dry, tough, or undercooked in the center.

Different cooking methods, from stove-top simmering to slow cookers and ovens, impact how quickly and evenly the internal temperature rises. Knowing the target internal temp of corned beef allows home cooks and professional chefs alike to control doneness, preserve moisture, and achieve consistent results every time. This knowledge is essential for creating dishes that are safe to eat and enjoyable to serve.

Understanding Corned Beef and Its Cooking Requirements

What Is Corned Beef?

Corned beef is a cut of beef, typically brisket, cured with a mixture of salt, spices, and sometimes sugar. The term “corned” comes from the large grains of salt, called “corns,” used in the curing process. It is commonly prepared by simmering, slow cooking, or braising to make the meat tender and flavorful.

  • Often sold pre-cured or pickled.

  • Requires slow, steady heat to break down connective tissue.

  • Popular in traditional dishes like corned beef and cabbage.

Why Cooking Temperature Matters

Cooking temperature directly affects both safety and texture. Meat must reach temperatures high enough to kill harmful bacteria but also allow collagen in the brisket to break down.

  • Too low: unsafe to eat and potentially tough.

  • Too high: can dry out the meat if not cooked properly.

  • Proper temp ensures even cooking and desired tenderness.

Food Safety Guidelines for Corned Beef

USDA Recommended Internal Temperature

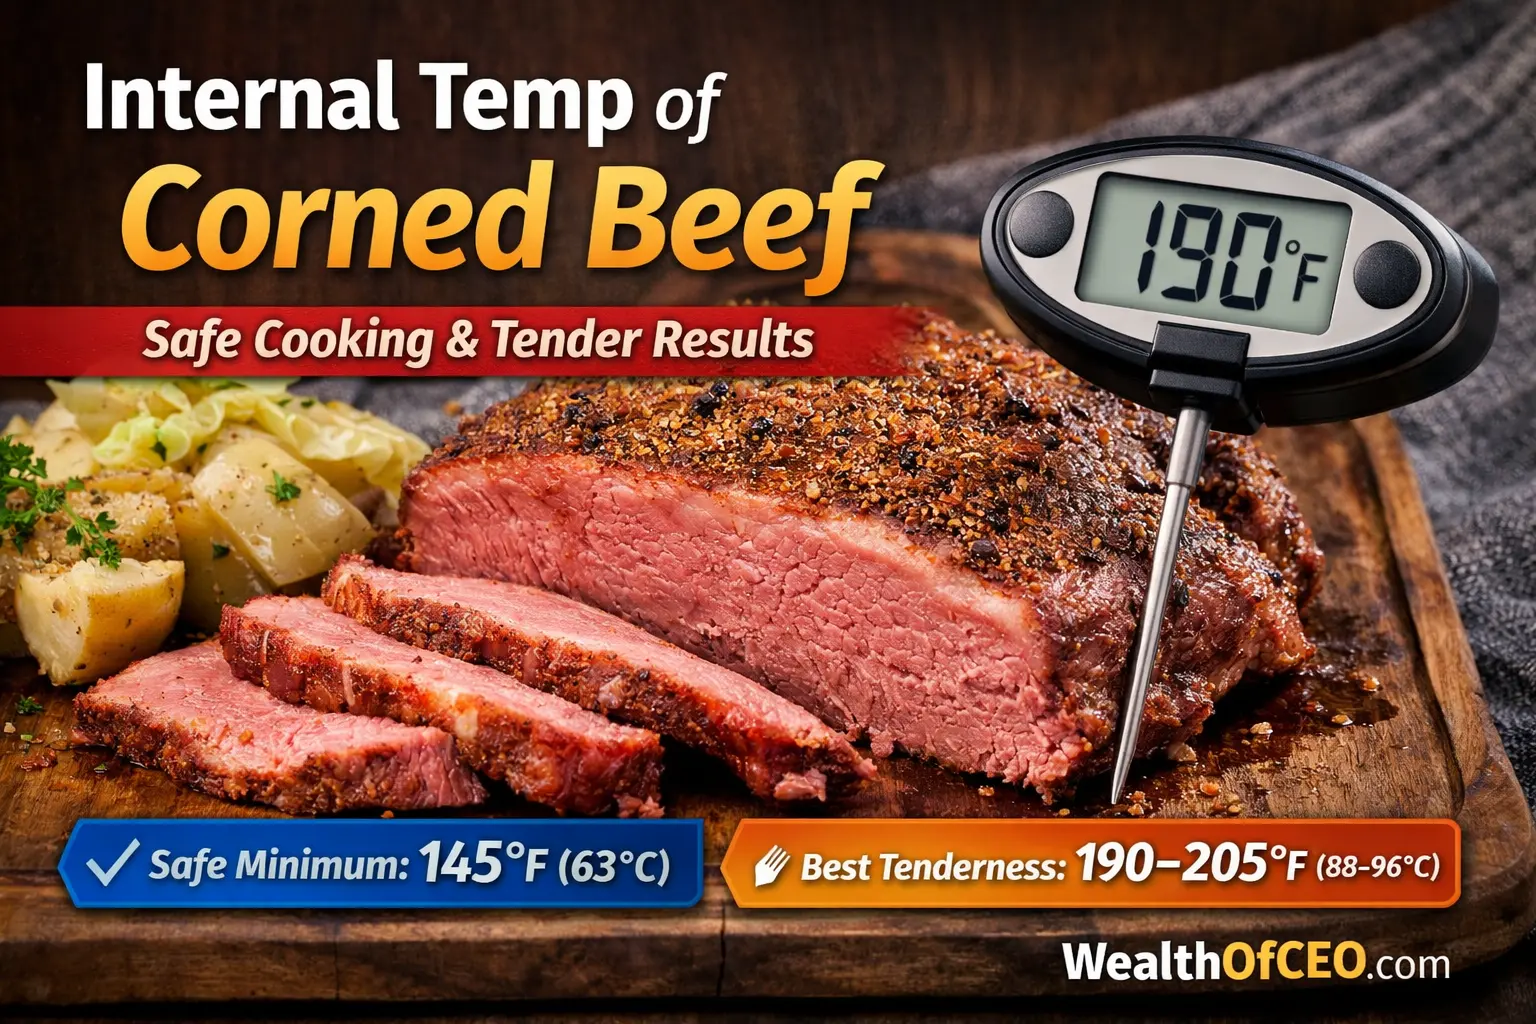
Corned beef should reach 145 °F (63 °C) minimum, according to USDA guidelines. This ensures the meat is safe to eat while maintaining some moisture.

  • Use a reliable thermometer to verify doneness.

  • The pink color from curing does not indicate undercooking.

  • Always check the thickest part of the meat for accurate readings.

Resting Time and Safety Precautions

After reaching the minimum temperature, allow the meat to rest for at least three minutes. Resting redistributes juices and finalizes bacterial kill.

  • Tent with foil to retain heat.

  • Avoid slicing immediately to preserve moisture.

  • Helps maintain consistent internal temperature across the meat.

The Science Behind Internal Temperature and Texture

How Heat Affects Collagen and Muscle Fibers

Heating transforms collagen into gelatin, which makes the meat tender. Muscle fibers contract and expel water at high temperatures, which can dry meat if overcooked.

  • Slow, controlled heat ensures proper collagen breakdown.

  • Collagen conversion begins around 160 °F and continues up to 205 °F.

  • Rapid heat can toughen fibers before collagen softens.

Achieving Tenderness vs. Overcooking

Tender corned beef requires reaching the temperature where connective tissue melts without letting muscle fibers tighten excessively.

  • Target range: 180–205 °F for fork-tender results.

  • Overcooking above 205 °F may cause dryness in leaner sections.

  • Timing and temperature control are critical to balance safety and texture.

Measuring the Internal Temperature Correctly

Best Thermometers for Corned Beef

Digital instant-read thermometers provide accurate, quick readings. Probe thermometers can monitor slow-cooked meat without opening the lid.

  • Digital instant-read: check multiple spots quickly.

  • Probe thermometer: ideal for slow cookers or ovens.

  • Ensure calibration for reliable results.

Where to Insert the Thermometer for Accurate Reading

Insert in the thickest part of the brisket, avoiding fat pockets or bone.

  • Center of the meat gives the most representative temp.

  • Avoid touching the cooking vessel, which may give false high readings.

  • Rotate thermometer if using different spots to confirm consistency.

Common Measurement Mistakes

  • Inserting too shallowly, near the edge, or into fat.

  • Checking immediately after removing from heat without resting.

  • Relying on color alone, especially with cured meat.

Step-by-Step Cooking Methods

Stove-Top Simmering

Bring water or broth to a gentle simmer, then maintain low heat until meat reaches target temperature.

  • Keep temperature steady to avoid overcooking.

  • Check internal temp every 30–45 minutes.

  • Skim foam to prevent bitterness.

Oven Braising Techniques

Cook meat in covered pan at low heat with liquid.

  • Preheat oven to 300 °F or lower.

  • Maintain meat partially submerged in liquid.

  • Use foil or lid to retain moisture.

Slow Cooker and Pressure Cooker Methods

Slow cookers allow long, low-temperature cooking; pressure cookers speed the process while tenderizing.

  • Slow cooker: 8–10 hours on low, check for 190–205 °F.

  • Pressure cooker: 60–90 minutes depending on size, target same internal temp.

  • Always measure temp before serving.

Temperature Ranges for Desired Results

Safe Minimum Temperature

145 °F ensures bacterial safety but may leave meat firm.

  • Rest for at least 3 minutes.

  • Safe for consumption even if slightly pink.

Tender and Juicy Temperature

180–190 °F produces tender, moist meat without shredding.

  • Collagen partially broken down.

  • Retains juiciness in slices.

Fork-Tender / Shreddable Temperature

190–205 °F achieves full collagen conversion, yielding easily shreddable meat.

  • Ideal for braised or slow-cooked dishes.

  • Requires careful monitoring to avoid drying edges.

Common Mistakes and How to Avoid Them

Undercooking or Overcooking

  • Undercooking risks bacterial contamination.

  • Overcooking dries lean parts if temperature isn’t controlled.

  • Maintain steady heat for even results.

Misreading Thermometers

  • Avoid touching bone or fat.

  • Calibrate thermometers regularly.

  • Insert thermometer in multiple spots to confirm accuracy.

Timing and Temperature Mismanagement

  • Checking too early or too late can skew results.

  • Record cooking start time and adjust heat as needed.

  • Match method (slow cooker vs. oven) to meat thickness.

Tips for Enhancing Flavor While Maintaining Safety

Brining and Seasoning

Brining enhances moisture retention; seasoning improves flavor profile.

  • Use balanced salt solution to avoid oversalting.

  • Apply spices early for depth of flavor.

  • Brining complements internal temp control by slowing moisture loss.

Slow vs. Fast Cooking Impact on Taste

Slow cooking develops richer flavor and more tender texture.

  • High-heat quick cooking can toughen fibers despite reaching safe temp.

  • Low, steady heat gives even seasoning penetration.

  • Match method to desired doneness and texture.

Tools and Techniques for Perfect Corned Beef

Digital Thermometers vs. Probe Thermometers

  • Digital instant-read: quick checks, best for finishing temp.

  • Probe: continuous monitoring in oven or slow cooker.

  • Choose based on cooking method and precision needed.

Cooking Accessories That Improve Accuracy

  • Heatproof tongs, racks, and roasting pans help maintain even heat.

  • Lids and foil control evaporation.

  • Slow cooker liners or inserts ensure consistent temperature distribution.

Corned Beef Cooking Checklist

Pre-Cooking Preparations

  • Rinse brined meat if needed.

  • Trim excess fat or silver skin.

  • Prepare seasoning or braising liquid.

During Cooking Temperature Monitoring

  • Insert thermometer in thickest section.

  • Track temperature at intervals.

  • Adjust heat to maintain steady internal temp.

Post-Cooking Resting and Serving

  • Rest for 3–10 minutes covered with foil.

  • Slice against the grain for tenderness.

  • Serve with juices or braising liquid to retain moisture.

Comparing Cooking Approaches

Stove-Top vs. Oven

  • Stove-top: precise control, ideal for smaller cuts.

  • Oven: even heat, less active monitoring required.

  • Both can achieve similar tenderness when internal temp is monitored.

Slow Cooker vs. Pressure Cooker

  • Slow cooker: longer time, very tender results.

  • Pressure cooker: faster but requires attention to release method.

  • Choice depends on time and texture preference.

Pros and Cons of Each Method

  • Stove-top: active supervision, gentle cooking.

  • Oven: passive, reliable heat.

  • Slow cooker: long cooking, hands-off.

  • Pressure cooker: quick, risk of overcooking edges.

Key Takeaways for Home Cooks and Professionals

Summary of Temperature Guidelines

  • Minimum safe: 145 °F with 3-minute rest.

  • Tender and juicy: 180–190 °F.

  • Fork-tender/shreddable: 190–205 °F.

Balancing Safety and Flavor

  • Monitor temperature accurately.

  • Use slow, controlled cooking for best texture.

  • Rest meat before slicing to retain juices and safety.

FAQs

1. What is the safe internal temp of corned beef?

The safe internal temp of corned beef is 145 °F (63 °C), followed by a 3-minute rest. This ensures the meat is free from harmful bacteria while retaining moisture.

2. Can corned beef be pink inside when fully cooked?

Yes, corned beef may remain pink due to the curing process, even when it has reached a safe temperature. Color alone doesn’t indicate doneness.

3. How long should corned beef rest after cooking?

Resting for at least 3 minutes allows juices to redistribute and finalizes the cooking process, resulting in more tender, evenly cooked meat.

4. What causes corned beef to be tough despite cooking it properly?

Toughness usually occurs when collagen hasn’t fully broken down. Cooking longer at moderate temperatures (180–205 °F) softens the connective tissue for a tender texture.

5. Which cooking method best preserves the internal temp of corned beef?

Slow cooking or braising helps maintain a consistent internal temp, breaking down collagen gradually while keeping the meat moist and flavorful.

Continue Reading

Blog

4 Pics One Word 9 Letters Answers

Published

on

By

4 Pics One Word 9 Letters Answers

Finding the right solution in 4 Pics One Word 9 letters answers can be challenging, especially as levels become longer and more abstract. Players often struggle to connect all four images to a single nine-letter word, making strategic approaches essential for solving puzzles efficiently.

Using a structured method to approach 4 Pics One Word 9 letters answers helps players save time, improve pattern recognition, and expand their vocabulary. This guide provides practical techniques, answer lists, and expert strategies to tackle even the most difficult nine-letter levels.

Understanding 4 Pics 1 Word and Its Gameplay

What is 4 Pics 1 Word?

4 Pics 1 Word is a puzzle game where players see four images and must identify the single word that connects them.

  • The word can range from three letters to nine or more.

  • Each level challenges players’ observation, vocabulary, and pattern recognition.

  • Success depends on analyzing both obvious and subtle connections between the images.

How puzzle levels are structured

Levels are organized sequentially, increasing in difficulty as players advance.

  • Early levels use common words and direct visual connections.

  • Mid-levels introduce abstract concepts and longer words.

  • Advanced levels often rely on indirect associations or cultural references.

  • Letters for the solution are provided in a pool, mixing correct letters with distractors.

Why letter counts matter in gameplay

Letter counts define the target word length and narrow possible answers.

  • They guide players to focus only on words that match the exact number of letters.

  • Longer words increase difficulty by offering more letter combinations.

  • Awareness of letter count improves speed and accuracy in guessing.

What “9 Letters” Means in 4 Pics 1 Word

Significance of 9-letter answers

Nine-letter answers represent some of the most challenging levels in the game.

  • They require more observation and strategic thinking.

  • Players must identify patterns across four images while juggling multiple letters.

  • Mastering 9-letter words builds skill for solving longer or abstract puzzles.

Difficulty compared to shorter words

Nine-letter puzzles are more complex than 3–8 letter words.

  • Longer words allow for more distractor letters.

  • Players need a stronger vocabulary to recognize less common words.

  • Mistakes in one letter can derail the entire solution.

Examples of 9-letter word patterns

  • Words can relate to objects, actions, or abstract ideas.

  • Examples include: ACROBATIC, ALLIGATOR, ADVENTURE, AMBULANCE.

  • Patterns often repeat in thematic categories like animals, jobs, or daily life.

How to Solve 9-Letter Puzzles Effectively

Step-by-step solving techniques

  1. Review all four images carefully.

  2. Note common themes or objects in the pictures.

  3. Count letters and consider possible word lengths.

  4. Test likely combinations using available letters.

  5. Verify the word matches all images logically.

Using visual clues strategically

  • Focus on unique or unusual elements in each image.

  • Identify shared characteristics, colors, or actions.

  • Eliminate letters that don’t fit the images’ context.

Tips for breaking down longer words

  • Separate the word into prefixes, suffixes, or root words.

  • Use familiar letter sequences to predict the remainder.

  • Consider synonyms or related terms to expand options.

Common 9-Letter Answers and Their Patterns

Alphabetical list of popular answers

  • ACROBATIC

  • ADVENTURE

  • ALLIGATOR

  • AMBULANCE

  • AMUSEMENT

  • ASTROLOGY

  • AUTOMATIC

  • BUTTERFLY

  • CHECKMATE

  • EYELASHES

Categorization by theme or topic

  • Animals: ALLIGATOR, DALMATIAN

  • Activities: ACROBATIC, ADVENTURE

  • Objects: AMBULANCE, WALLPAPER

  • Abstract: FEROCIOUS, REVOLTING

How patterns repeat across levels

  • Words from earlier levels reappear in later stages with different images.

  • Common themes like animals, jobs, and actions recur frequently.

  • Recognizing repeated patterns can speed up solving new puzzles.

Tools and Resources for Finding Answers

Online answer databases

  • Websites host complete 9-letter answer lists searchable alphabetically.

  • Databases often categorize answers by theme for easier reference.

  • Real-time updates reflect new game versions and puzzle additions.

Mobile apps and helper tools

  • Some apps provide hints or partial letter suggestions.

  • Helper tools allow players to enter known letters to find matches.

  • Features may include reverse search by letter arrangement.

Search techniques using letters you know

  • Focus on letters you are certain appear in the word.

  • Combine them with visual hints from the images.

  • Cross-reference with databases to narrow options quickly.

Benefits of Using Answer Lists

Saves time for stuck players

  • Immediate access to answers prevents frustration.

  • Reduces trial-and-error guessing.

  • Keeps gameplay enjoyable and flowing.

Improves puzzle-solving skills

  • Exposure to diverse words enhances vocabulary.

  • Encourages pattern recognition for future levels.

  • Builds confidence in tackling challenging puzzles.

Helps understand word-picture associations

  • Players learn how abstract concepts are visually represented.

  • Improves ability to infer connections between images.

  • Supports quicker recognition of themes in new levels.

Strategies to Guess 9-Letter Words Without Cheats

Using letter frequency

  • Start with common letters like E, A, and R.

  • Eliminate unlikely letters based on image context.

  • Prioritize letter combinations that form recognizable roots.

Recognizing prefixes and suffixes

  • Identify common endings like -ING, -TION, -MENT.

  • Look for beginnings like UN-, RE-, or AUTO-.

  • Break words into segments to simplify guessing.

Connecting images to abstract concepts

  • Translate visual hints into descriptive words.

  • Consider figurative meanings or idioms.

  • Explore broader associations beyond literal objects.

Common Mistakes Players Make

Overlooking subtle visual clues

  • Ignoring small details can mislead guesses.

  • Focus on every element of each image.

  • Check for connections in color, shape, or action.

Ignoring letter count patterns

  • Not paying attention to the nine-letter requirement leads to wasted guesses.

  • Always cross-check letter totals before finalizing a word.

  • Use letter count as a filter for potential solutions.

Relying too heavily on random guesses

  • Guessing without analyzing images increases error rate.

  • Structured approaches reduce frustration.

  • Random attempts rarely succeed on longer words.

Comparing 9-Letter Levels to Other Word Lengths

Differences in difficulty

  • Longer words increase the number of possible combinations.

  • More letters mean more room for distractor letters.

  • Abstract associations are more common in 9-letter puzzles.

Tips unique to longer puzzles

  • Break the word into smaller parts.

  • Use prefix and suffix recognition.

  • Prioritize key visual clues over guesswork.

Advantages of practicing with 9-letter levels

  • Enhances vocabulary and cognitive flexibility.

  • Builds stronger pattern recognition skills.

  • Prepares players for even longer or abstract words.

Actionable Checklist for Solving 9-Letter Puzzles

Steps before guessing

  • Examine all four images carefully.

  • Identify common themes or patterns.

  • Note the exact letter count.

Steps during gameplay

  • Test letter combinations that match observed patterns.

  • Use available hints strategically.

  • Eliminate unlikely letters based on context.

Steps for review and learning

  • Record challenging words for practice.

  • Analyze mistakes to refine future guesses.

  • Review recurring patterns to improve speed.

Best Practices for 4 Pics 1 Word Enthusiasts

Organizing answers systematically

  • Maintain an alphabetical or thematic list.

  • Track solved puzzles for reference.

  • Group words by letter length for efficiency.

Practicing without spoiling levels

  • Avoid checking solutions immediately.

  • Use hints sparingly to enhance learning.

  • Focus on observation skills and deduction.

Improving visual association skills

  • Study image connections carefully.

  • Practice connecting abstract images to words.

  • Experiment with synonyms and broader concepts.

Advanced Techniques and Expert Tips

Recognizing less obvious word associations

  • Look for indirect connections across images.

  • Consider idiomatic or metaphorical links.

  • Test multiple interpretations before finalizing a word.

Using online communities effectively

  • Join forums for tips and shared strategies.

  • Discuss challenging puzzles without revealing spoilers.

  • Learn from experienced players’ insights.

Predicting answers based on previous patterns

  • Identify recurring themes and word types.

  • Use knowledge of common prefixes, suffixes, and root words.

  • Anticipate likely solutions for similar images in new levels.

FAQs

How many 9-letter answers are there in 4 Pics 1 Word?

There are hundreds of nine-letter solutions spread across various levels, and the number grows as new puzzles are added.

Can answers change between different app versions of 4 Pics 1 Word?

Yes, some answers may differ depending on updates, region, or platform. Always check version-specific answer lists.

What is the best strategy for solving 9-letter puzzles without cheats?

Focus on visual clues, use letter patterns, and break words into prefixes, suffixes, or root components to narrow possibilities.

Where can I find a complete 4 Pics One Word 9 letters answers list?

Reliable online databases and apps provide comprehensive lists that are searchable alphabetically or by theme for quick reference.

Do 9-letter levels repeat patterns from shorter words in 4 Pics 1 Word?

Yes, themes, word types, and visual associations often recur, making it easier to predict answers once patterns are recognized.

Continue Reading

Blog

Penne Mit Bolognese

Published

on

By

Penne Mit Bolognese

Penne mit Bolognese is a structured, meat-based pasta dish built around slow-cooked ragù and firm, tubular pasta. It combines protein, carbohydrates, and fat in a balanced way, making it a complete main course rather than a side. The dish relies on controlled simmering, proper pasta cooking, and correct sauce integration to achieve consistent texture and depth of flavor.

In professional kitchens and home settings alike, penne mit Bolognese is valued for its repeatability and adaptability. The preparation process is straightforward, but execution matters at every stage, from browning the meat properly to finishing the pasta inside the sauce. When handled correctly, the result is a cohesive, well-seasoned dish with stable structure and rich taste.

What Is Penne mit Bolognese?

Penne mit Bolognese is a pasta dish made with tubular penne pasta served with a slow-cooked meat-based sauce known as ragù.

  • Combines short pasta with a rich meat sauce

  • Typically uses beef, soffritto, tomato, and broth

  • Served hot with grated hard cheese

  • Focuses on balance, texture, and depth of flavor

It is structured as a complete main course, not a side dish.

Origin of Bolognese Sauce (Ragù alla Bolognese)

Bolognese sauce originates from Bologna, Italy, and is traditionally called Ragù alla Bolognese.

  • Developed as a slow-cooked meat sauce

  • Built on soffritto: onion, carrot, celery

  • Includes ground meat, tomato paste, wine, and broth

  • Simmered gently for several hours

Authentic versions emphasize meat richness over heavy tomato content.

Why Penne Works Well with Bolognese

Penne works well because its ridges and hollow center trap thick meat sauce effectively.

  • Tubular shape captures chunks of meat

  • Ridged surface improves sauce adhesion

  • Holds structure during mixing

  • Suitable for plated or baked variations

This improves flavor distribution in every bite.

Is It Traditionally Italian or a Modern Variation?

Traditionally, ragù is served with tagliatelle, not penne.

  • Tagliatelle is common in Bologna

  • Penne became popular outside Italy

  • Widely accepted in home cooking

  • Common in international restaurants

Penne with Bolognese is a practical adaptation, not the original pairing.

Ingredients for Authentic Penne mit Bolognese

Authentic preparation relies on simple, high-quality ingredients with correct proportions.

  • Ground beef or beef-pork mix

  • Soffritto base

  • Tomato paste, limited crushed tomato

  • Dry white or red wine

  • Beef broth or stock

  • Whole milk (optional traditional addition)

Balance matters more than quantity.

Core Ingredients for Classic Bolognese Sauce

Classic sauce requires meat, aromatics, tomato paste, wine, and broth.

  • Finely chopped onion, carrot, celery

  • Ground beef (15–20% fat preferred)

  • Tomato paste, not heavy tomato sauce

  • Dry wine for deglazing

  • Broth for slow simmer

Milk may be added to soften acidity.

Choosing the Right Type of Penne

Use high-quality durum wheat semolina penne.

  • Bronze-cut pasta holds sauce better

  • Ridged (penne rigate) preferred

  • Avoid thin, smooth varieties

  • Check cooking time on packaging

Structure must hold during mixing.

Optional Additions for Enhanced Flavor

Optional ingredients deepen complexity without changing authenticity.

  • Bay leaf during simmer

  • Nutmeg in small quantity

  • Parmesan rind in sauce

  • Fresh parsley for garnish

Use restraint; avoid overpowering spices.

How to Make Penne mit Bolognese Step by Step

The dish is made by preparing sauce first, cooking pasta separately, then combining.

  • Build soffritto base

  • Brown meat properly

  • Deglaze with wine

  • Simmer slowly

  • Cook pasta al dente

  • Combine with reserved pasta water

Timing coordination is essential.

Preparing the Bolognese Sauce Properly

Proper sauce preparation requires layering flavors gradually.

  1. Sweat soffritto in olive oil.

  2. Add meat and brown thoroughly.

  3. Deglaze with wine and reduce.

  4. Stir in tomato paste.

  5. Add broth and simmer 1.5–3 hours.

Low heat prevents dryness.

Cooking Penne to Perfect Al Dente Texture

Cook penne in heavily salted boiling water until firm but cooked.

  • Use large pot for even cooking

  • Salt water generously

  • Stir during first minute

  • Taste test before draining

  • Reserve 1 cup pasta water

Drain before fully soft.

Combining Pasta and Sauce the Right Way

Combine pasta and sauce in the pan, not on the plate.

  • Add drained penne directly to sauce

  • Toss over medium heat

  • Add reserved pasta water gradually

  • Cook together for 1–2 minutes

This creates natural emulsification.

Final Garnishing and Serving Tips

Finish with grated hard cheese and light herbs.

  • Freshly grated Parmigiano-Reggiano

  • Small drizzle of olive oil

  • Optional cracked black pepper

  • Serve immediately

Avoid excessive cheese layering.

How Long Does Penne mit Bolognese Take to Cook?

Total cooking time ranges between 60 and 180 minutes depending on sauce method.

  • Quick version: 60–75 minutes

  • Traditional slow version: 2–3 hours

  • Pasta cooks separately in 10–12 minutes

Sauce time defines quality.

Preparation Time

Preparation typically takes 15–20 minutes.

  • Chop vegetables finely

  • Measure ingredients

  • Bring broth to room temperature

Efficient prep improves flow.

Cooking Time

Cooking time depends on simmer length.

  • Browning phase: 10–15 minutes

  • Simmering: 60–150 minutes

  • Pasta boiling: 10–12 minutes

Longer simmer increases depth.

Total Time Breakdown

Total active and passive time averages 90–150 minutes.

  • Prep: 20 minutes

  • Sauce cooking: 90 minutes

  • Pasta + combining: 15 minutes

Planning avoids overcooking pasta.

What Makes a Traditional Bolognese Sauce Authentic?

Authenticity depends on meat-forward balance and slow cooking.

  • Minimal tomato dominance

  • Use of soffritto

  • Wine reduction

  • Gentle simmer

Texture should be thick, not watery.

Key Differences from Standard Tomato Meat Sauce

Traditional ragù contains less tomato and more meat.

  • Tomato paste instead of heavy crushed tomato

  • Includes milk in many versions

  • Simmered longer

  • Thicker consistency

It is not a simple marinara with meat.

Slow Cooking vs Quick Version

Slow cooking produces deeper flavor and better texture.

  • Fat renders properly

  • Aromatics fully integrate

  • Acidity softens

  • Meat becomes tender

Quick versions lack complexity.

Common Myths About Bolognese

Common myths distort traditional preparation.

  • Myth: It must contain garlic

  • Myth: It is very tomato-heavy

  • Myth: It requires many herbs

  • Myth: It is always served with spaghetti

Traditional versions are simpler.

Nutritional Value of Penne mit Bolognese

Nutritional value depends on portion size and meat fat content.

  • Moderate protein content

  • High carbohydrate base

  • Fat varies by meat choice

  • Calorie-dense main meal

Portion control matters.

Calories per Serving

Average serving contains 500–700 calories.

  • 100g dry pasta ≈ 350 calories

  • Sauce portion ≈ 200–350 calories

  • Cheese adds 50–100 calories

Exact value depends on fat percentage.

Protein, Carbohydrates, and Fat Breakdown

Typical macro distribution:

  • Protein: 25–35g

  • Carbohydrates: 60–80g

  • Fat: 20–35g

Balance varies by recipe.

How to Make It Healthier

Healthier preparation reduces fat and increases fiber.

  • Use lean ground beef or turkey

  • Add finely chopped vegetables

  • Reduce cheese portion

  • Use whole-grain penne

Maintain flavor balance.

Variations of Penne mit Bolognese

Variations adapt protein or texture while keeping structure similar.

  • Meat substitutions

  • Plant-based options

  • Spice adjustments

  • Cream additions

Core method remains consistent.

Vegetarian or Plant-Based Version

Plant-based versions replace meat with protein alternatives.

  • Lentils or mushrooms

  • Plant-based mince

  • Extra vegetables

  • Vegetable broth

Maintain slow simmer for depth.

Chicken or Turkey Alternative

Chicken or turkey creates lighter variation.

  • Use thigh meat for moisture

  • Increase seasoning slightly

  • Avoid overcooking lean meat

Texture will be softer.

Creamy Bolognese Variation

Creamy variation adds dairy richness.

  • Stir in heavy cream at end

  • Use mascarpone lightly

  • Reduce broth slightly

Avoid turning it into Alfredo-style sauce.

Spicy Italian-Style Variation

Spicy version introduces controlled heat.

  • Add chili flakes

  • Use spicy Italian sausage

  • Balance heat with milk

Spice should not overpower meat.

Best Practices for Perfect Results Every Time

Consistent results rely on process control and ingredient quality.

  • Proper browning

  • Measured seasoning

  • Controlled simmer

  • Correct pasta timing

Attention to detail defines outcome.

Choosing Quality Ingredients

Quality ingredients directly affect flavor.

  • Fresh vegetables

  • High-fat ground beef

  • Good wine

  • Authentic hard cheese

Avoid low-quality canned sauces.

Proper Meat Browning Technique

Proper browning builds foundation flavor.

  • Use wide pan

  • Do not overcrowd

  • Let meat sear before stirring

  • Cook until moisture evaporates

Color equals flavor development.

Balancing Acidity and Seasoning

Balance prevents sharp or flat taste.

  • Add milk to soften acidity

  • Adjust salt gradually

  • Taste before serving

  • Avoid excess sugar

Final seasoning must be subtle.

Common Mistakes to Avoid When Making Penne mit Bolognese

Mistakes usually affect texture or flavor balance.

  • Overcooked pasta

  • Watery sauce

  • Excess tomato

  • Insufficient seasoning

Control each stage carefully.

Overcooking the Pasta

Overcooked pasta becomes soft and breaks.

  • Follow package timing

  • Taste test early

  • Finish cooking in sauce

Al dente provides structure.

Using Too Much Tomato

Too much tomato creates acidic, thin sauce.

  • Use paste, not large canned volumes

  • Let meat dominate flavor

  • Avoid heavy marinara base

Traditional sauce is meat-forward.

Skipping Simmering Time

Skipping simmer reduces depth.

  • Meat stays coarse

  • Flavors remain separate

  • Texture lacks cohesion

Time improves integration.

Not Salting Pasta Water Properly

Unsalted water leads to bland pasta.

  • Salt generously before boiling

  • Do not salt after draining

  • Sauce cannot fully compensate

Seasoning starts at water stage.

Storage, Reheating, and Meal Prep Tips

Proper storage maintains food safety and quality.

  • Cool quickly

  • Refrigerate within 2 hours

  • Store separately when possible

Shelf life matters.

How to Store Leftovers Safely

Store in airtight containers.

  • Refrigerate up to 3–4 days

  • Keep sauce separate if possible

  • Label with date

Avoid room-temperature storage.

Freezing Bolognese Sauce

Bolognese sauce freezes well.

  • Cool completely

  • Use freezer-safe containers

  • Freeze up to 3 months

  • Thaw overnight in refrigerator

Do not refreeze repeatedly.

Best Way to Reheat Without Drying Out

Reheat gently with added moisture.

  • Use stovetop over low heat

  • Add splash of broth or water

  • Stir frequently

  • Avoid microwave overheating

Maintain texture integrity.

Penne mit Bolognese vs Spaghetti Bolognese: What’s the Difference?

The difference lies mainly in pasta shape and texture interaction.

  • Tubular vs long strand

  • Sauce retention varies

  • Regional tradition differs

Flavor base remains similar.

Texture and Sauce Absorption

Penne holds chunky sauce internally.

  • Captures meat inside tube

  • Provides thicker bite

  • Less slippage

Spaghetti distributes sauce along surface.

Authentic Italian Serving Traditions

Traditional ragù is served with tagliatelle.

  • Flat pasta preferred in Bologna

  • Spaghetti is global adaptation

  • Penne is modern practical option

Regional customs vary.

Which Pasta Shape Is Better?

Choice depends on preference.

  • Penne: better for chunky texture

  • Spaghetti: smoother experience

  • Tagliatelle: most traditional

All are structurally viable.

Essential Tools and Kitchen Equipment

Proper tools improve consistency and control.

  • Heavy-bottom pot

  • Wide sauté pan

  • Large pasta pot

  • Wooden spoon

Equipment affects heat distribution.

Recommended Cookware

Use thick-bottomed pans for even cooking.

  • Dutch oven for sauce

  • Stainless steel sauté pan

  • Large stockpot for pasta

Avoid thin aluminum pans.

Tools That Improve Sauce Texture

Certain tools enhance refinement.

  • Fine knife for soffritto

  • Food processor (optional)

  • Microplane for cheese

Precision improves consistency.

Optional Equipment for Efficiency

Optional tools save time but are not mandatory.

  • Immersion blender (light texture adjustment)

  • Pasta strainer insert

  • Kitchen scale

Accuracy supports repeatability.

Frequently Asked Questions

What is the difference between penne mit Bolognese and traditional ragù alla Bolognese?

Traditional ragù alla Bolognese is usually served with tagliatelle, while penne is a later adaptation. The sauce base remains similar, but the pasta shape changes texture and sauce distribution.

Can I prepare penne mit Bolognese ahead of time for meal prep?

Yes, the sauce can be prepared 1–2 days in advance and stored in the refrigerator. Cook the pasta fresh and combine before serving for best texture.

How do I prevent penne from becoming too soft in the dish?

Cook the pasta al dente, drain slightly early, and finish cooking it inside the sauce for 1–2 minutes. Avoid overboiling and prolonged reheating.

What type of meat produces the most authentic flavor in Bolognese sauce?

Ground beef with moderate fat content or a beef-pork blend provides the most balanced flavor and texture. Lean-only meat tends to produce a dry result.

Is penne mit Bolognese considered an authentic Italian dish?

While the Bolognese sauce itself is traditional, pairing it with penne is more of a modern adaptation rather than the classic regional serving style.

Continue Reading

Blog

Cancel Order Adam and Eve

Published

on

By

Cancel Order Adam and Eve

Cancelling an order with Adam & Eve can be confusing if you are unsure of the process or timing. Understanding how to cancel an order Adam and Eve is essential to ensure you receive a refund or avoid unwanted shipments. Knowing the proper steps and timelines helps you act quickly and reduces the risk of delays or complications.

This guide explains the full cancellation process, including verifying your order status, contacting customer support, and understanding refund policies. Whether your order has not yet shipped or you need guidance on returns after shipping, this information will help you manage your Adam & Eve orders efficiently and confidently.

Understanding Adam & Eve Order Cancellation

What Does “Cancel Order Adam and Eve” Mean?

Cancelling an Adam & Eve order means stopping the order from being processed or shipped before it reaches you. Once cancelled, the order will not be fulfilled, and a refund may be issued depending on the timing and store policy.

  • Cancellation applies only to orders not yet shipped.

  • Orders already processed may require returns instead.

  • The request must go through customer support or the account dashboard.

When Can You Cancel an Order?

You can cancel an order as long as it hasn’t entered the shipping process. Timing depends on product type and store handling.

  • Typically, orders can be cancelled within the first 12–24 hours after placement.

  • Pre-orders or special items may have stricter cancellation windows.

  • Once the order ships, cancellation is no longer possible, but returns are an option.

How the Cancellation Process Works

Step-by-Step Cancellation Procedure

Cancelling an order is straightforward if you follow these steps:

  1. Log into your Adam & Eve account.

  2. Locate the specific order under “My Orders.”

  3. Check if the “Cancel Order” option is available.

  4. Submit a cancellation request via dashboard or contact support directly.

  5. Keep confirmation of your cancellation for reference.

Timeline for Processing Cancellations

Cancellations are typically processed quickly but timelines can vary:

  • Immediate dashboard cancellations often take 1–2 business days to confirm.

  • Support-assisted cancellations may require 2–5 business days depending on response times.

  • Refunds, if applicable, are usually issued within 7–10 business days.

Checking Your Order Status Before Cancellation

How to Verify Order Status

Before attempting cancellation, confirm the order status:

  • Orders marked “Processing” can usually be cancelled.

  • Orders marked “Shipped” cannot be cancelled, but returns are possible.

  • Status updates are available in your account dashboard and order confirmation emails.

Tools for Tracking Your Adam & Eve Order

Use these tools to monitor order progress:

  • Online account dashboard for real-time status.

  • Tracking numbers via email once shipped.

  • Customer support for manual status verification.

Contacting Customer Support for Cancellations

Phone, Email, and Online Support Options

If dashboard cancellation isn’t available, contact support directly:

  • Call the official support number listed on the website.

  • Submit a cancellation request via the online contact form.

  • Use the support email provided for order issues.

What Information You Need to Provide

To ensure smooth processing, provide clear details:

  • Order number and date of purchase.

  • Items you wish to cancel.

  • Contact information and preferred method for confirmation.

Refund Policies and Timelines

How Refunds Are Processed After Cancellation

Refunds depend on order status and payment method:

  • Orders cancelled before shipping are typically fully refunded.

  • Payment method determines processing time—credit cards may take 5–7 business days, PayPal 1–3 business days.

  • Keep confirmation emails and transaction details for reference.

Handling Partial or Failed Refunds

Partial refunds or failures can occur due to:

  • Items already shipped or partially fulfilled.

  • Payment disputes or declined transactions.

  • In such cases, contact customer support promptly with your order details.

Cancellation After Shipping

Options if Your Order Has Already Shipped

Once an order ships, direct cancellation is no longer possible. Alternatives include:

  • Refusing the package at delivery to trigger a return.

  • Initiating a return through the store’s official process.

  • Tracking return shipping to ensure eligibility for a refund.

Return Procedures and Discreet Packaging Considerations

Adam & Eve uses discreet packaging, but return procedures remain straightforward:

  • Include original order details in the return package.

  • Follow store instructions for address and shipping method.

  • Refunds are processed once the returned package is received and verified.

Benefits of Early Cancellation

Avoiding Shipping and Processing Fees

Cancelling early prevents unnecessary charges:

  • No shipping or handling fees if the order is stopped before shipment.

  • Reduces administrative processing on the store’s side.

  • Minimizes delays in receiving a refund.

Faster Refunds and Reduced Hassle

Early cancellation saves time and effort:

  • Refunds are issued faster compared to post-shipment returns.

  • Fewer communications with support are needed.

  • Reduces risk of disputes or lost packages.

Common Mistakes When Cancelling

Delaying Contact With Support

Delaying can make cancellation impossible:

  • Orders may ship quickly, closing the cancellation window.

  • Late requests may require a full return process instead.

  • Always act as soon as possible after placing the order.

Misunderstanding Order Status or Shipping Windows

Confusing order status can cause errors:

  • “Processing” does not guarantee immediate cancellation.

  • “Shipped” orders cannot be cancelled, only returned.

  • Verify status before attempting cancellation.

Best Practices for a Smooth Cancellation

Keeping Order and Payment Records

Maintain clear documentation:

  • Save confirmation emails and order receipts.

  • Record cancellation requests and support correspondence.

  • Track payment refunds to confirm processing.

Communicating Clearly With Customer Service

Clear communication reduces delays:

  • Provide all relevant order details upfront.

  • Specify items to cancel and preferred outcome.

  • Confirm receipt of your request and estimated timeline.

Tools and Techniques to Manage Orders

Using Your Online Account Dashboard

The account dashboard is the most reliable tool:

  • View order status and shipping updates.

  • Submit cancellations when available.

  • Access past orders and support links quickly.

Email Templates for Cancellation Requests

Using a template saves time and ensures accuracy:

  • Include order number, date, items, and reason for cancellation.

  • Keep the tone factual and concise.

  • Attach screenshots if needed for verification.

Alternatives to Cancelling

Modifying an Order Instead of Cancelling

Some orders allow modifications before shipment:

  • Change quantities or swap items through the dashboard.

  • Contact support if dashboard options are unavailable.

  • Modifications are quicker and may avoid return processes.

Returning Items After Delivery

If cancellation is not possible, returning the product is an alternative:

  • Follow return policy guidelines for packaging and shipping.

  • Use tracking and retain proof of shipment.

  • Refund is processed after the return is received and verified.

Legal and Compliance Considerations

Consumer Rights for Cancellations

Consumers have certain protections:

  • Right to cancel before shipment depending on store policy.

  • Refund obligations for cancelled orders.

  • Additional protections may apply under regional consumer law.

Store Policies vs. Regional Laws

Policies may differ from legal rights:

  • Some regions allow cancellations even after shipment.

  • Always review local consumer protection laws alongside store policy.

  • Document all communications for compliance purposes.

Quick Action Checklist for Cancelling Adam & Eve Orders

Immediate Steps to Take Upon Ordering

  • Verify order details immediately.

  • Decide quickly if cancellation is needed.

  • Contact support or use the dashboard to submit the request.

Follow-Up Steps to Ensure Cancellation and Refund

  • Confirm receipt of your cancellation request.

  • Track refund processing until it completes.

  • Keep all communications and receipts for reference.

FAQs

How do I cancel an order Adam and Eve?

You can cancel an order Adam and Eve by checking your order status in your account dashboard and contacting customer support before the order ships.

Can I cancel an Adam & Eve order after it has shipped?

Once an order ships, direct cancellation is not possible, but you can initiate a return following the store’s return policy.

How long does it take to get a refund after cancelling an Adam & Eve order?

Refunds are typically processed within 7–10 business days, depending on the payment method and confirmation of cancellation.

What information do I need to provide to cancel an Adam & Eve order?

You should provide your order number, purchase date, items to cancel, and preferred contact details for confirmation.

Can I cancel multiple Adam & Eve orders at the same time?

Yes, but each order must be verified individually. Include all order numbers and details in your cancellation request to customer support.

Continue Reading

Trending

Copyright © 2025 Wealth of CEO. All rights reserved. Wealth of CEO may earn a portion of sales from products that are purchased through our site as part of our Affiliate Partnerships with retailers. The material on this site may not be reproduced, distributed, transmitted, cached or otherwise used, except with the prior written permission of Wealth of CEO