Tying a bow on a dress is a small detail that directly affects fit, comfort, and overall appearance. Many dresses rely on a bow instead of fixed fasteners, which means the final look depends on how well it is tied. Knowing how to tie a bow in a dress properly helps avoid uneven waists, loose fabric, or bows that come undone during wear.
This skill is practical rather than decorative alone. Whether the bow sits at the back, front, or side, the goal is the same: create balanced tension, keep the dress secure, and maintain a clean finish. A correctly tied bow supports the structure of the dress while allowing natural movement throughout the day or event.
What Does “Tying a Bow in a Dress” Mean?
Tying a bow in a dress means securing a fabric sash or ribbon into a looped knot that adjusts fit and adds structure or decoration.
It is both a fastening method and a styling step, depending on the dress design.
-
Used to cinch the waist, close a wrap, or finish a decorative detail
-
Relies on fabric tension, knot placement, and symmetry
-
Common on formal, casual, and occasion dresses
Types of dress bows commonly used
Most dress bows fall into a few standard functional styles.
These styles determine how the bow is tied and adjusted.
-
Flat waist bows for clean silhouettes
-
Looped decorative bows for visual detail
-
Wrap-style bows that also hold the dress closed
Where bows are usually placed on dresses
Bows are typically placed where they can control fit or balance design.
Placement affects comfort, visibility, and ease of tying.
-
Back waist on formal or bridesmaid dresses
-
Front or side waist on casual and wrap dresses
-
Shoulder or neckline for decorative designs
When and Why Dresses Use Bows
Dresses use bows to replace hardware, allow size adjustment, or add visual structure.
They are chosen when flexibility and softness are preferred over rigid fasteners.
-
Allow micro-adjustments without tailoring
-
Reduce reliance on zippers or hooks
-
Add a finished look without extra components
Decorative vs functional bows
Decorative bows are visual, while functional bows control fit or closure.
Knowing the difference changes how tightly the bow should be tied.
-
Decorative bows sit loosely and evenly
-
Functional bows must hold tension and stay secure
-
Some dresses use the same bow for both roles
Dresses that require manual bow tying
Some dresses are designed to be tied every time they are worn.
These designs depend on the wearer for proper fit.
-
Wrap dresses
-
Sash-waist dresses
-
Convertible or adjustable formal dresses
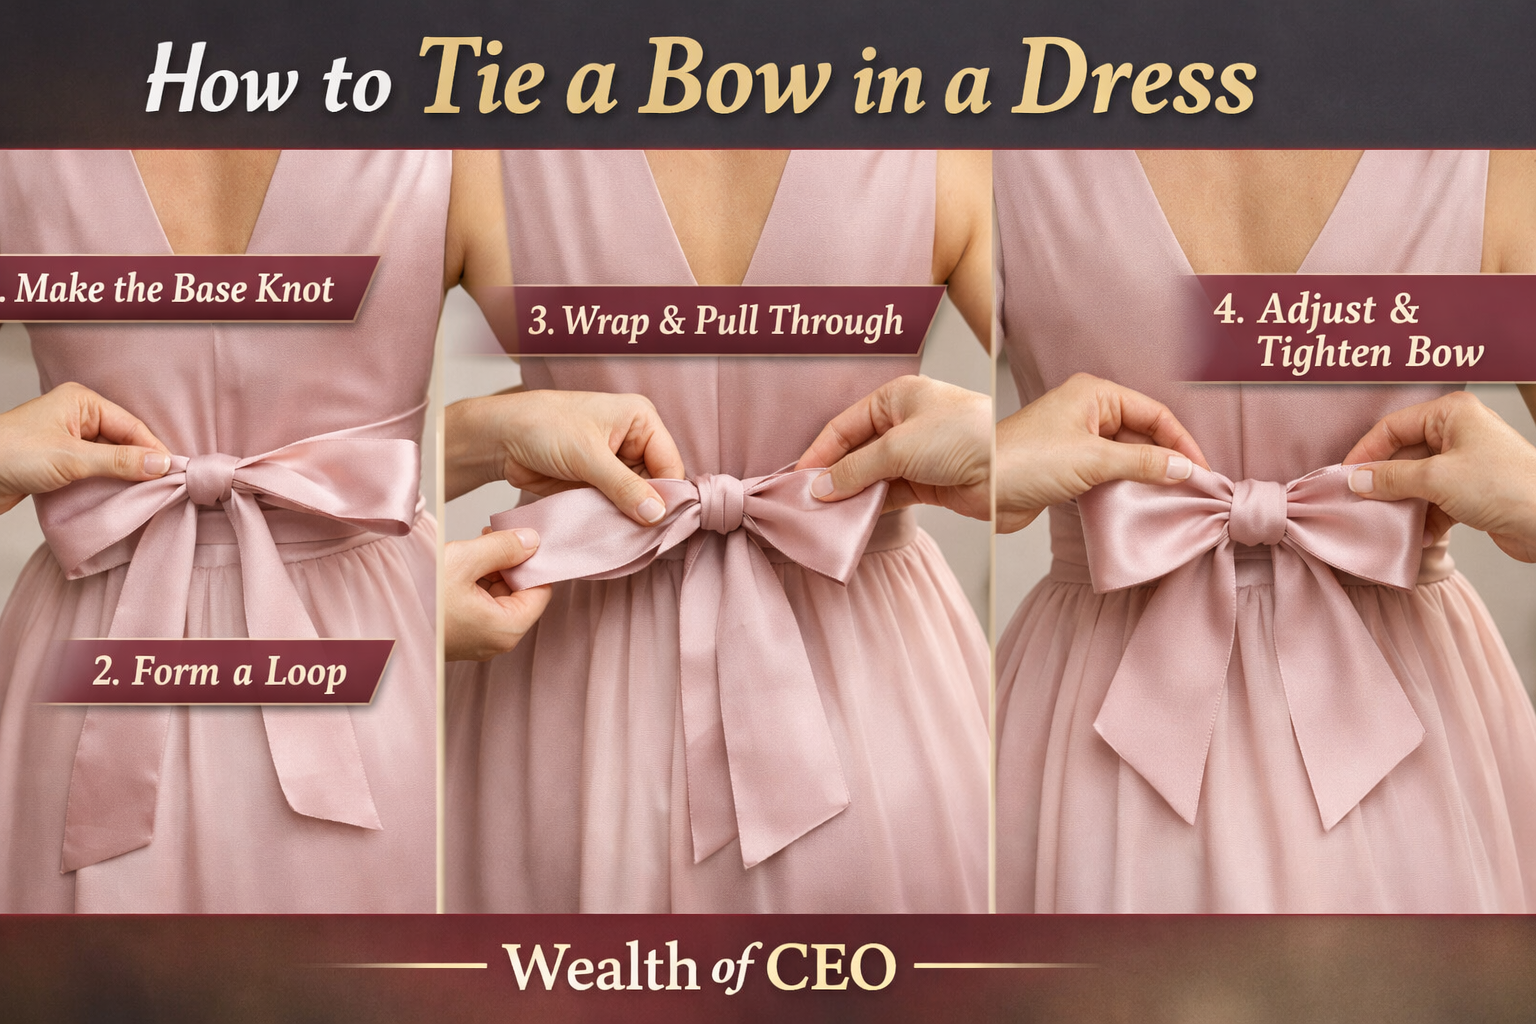
How to Tie a Bow in a Dress (Basic Method)
The basic method uses a simple knot followed by two balanced loops.
This approach works for most waist and sash-style dresses.
-
Similar mechanics to tying shoelaces
-
Focuses on even tension and symmetry
-
Works best when fabric lies flat
Preparing the sash or ribbon correctly
Proper preparation prevents twisting and uneven tension.
This step determines how clean the final bow looks.
-
Lay both ends flat against the body
-
Ensure equal length on each side
-
Smooth out folds before tying
Creating the base knot
The base knot anchors the bow and controls tightness.
It should be firm but not restrictive.
-
Cross one end over the other
-
Pull through to form a single knot
-
Adjust until the dress fits comfortably
Forming and tightening the bow loops
The loops create the visible bow shape.
Balance is more important than pulling tight.
-
Form one loop with one side
-
Wrap the other side around and pull through
-
Tighten slowly while adjusting loop size
How to Tie a Bow on the Back of a Dress
Tying a bow on the back uses the same method but requires positioning control.
The challenge is alignment rather than technique.
-
Common on formal and bridesmaid dresses
-
Often done without direct visibility
-
Requires post-tying adjustment
Positioning the sash behind the waist
Correct positioning keeps the bow centered.
This step prevents pulling the dress off balance.
-
Bring both ends evenly to the back
-
Keep tension consistent on both sides
-
Stand upright while tying
Tying evenly without seeing the bow
Even tension replaces visual guidance.
Hand placement matters more than speed.
-
Tie slowly and deliberately
-
Feel for equal loop size
-
Avoid pulling one side harder
Adjusting symmetry after tying
Final adjustment ensures a clean finish.
Small corrections make a visible difference.
-
Reach back and straighten loops
-
Pull gently on tails to level them
-
Check alignment using a mirror if possible
How to Tie a Bow on the Front or Side of a Dress
Front and side bows are easier to control and style.
They allow precise adjustment and visual balance.
-
Common on wrap and casual dresses
-
Easier to retie during wear
-
Often used as a design feature
Center-front bow technique
A center-front bow focuses on symmetry.
It should sit flat and centered on the waist.
-
Tie directly over the dress seam or midpoint
-
Keep loops equal in size
-
Let tails fall evenly
Side-waist bow styling method
Side bows create a softer, angled look.
They require controlled asymmetry.
-
Tie slightly off-center
-
Keep one tail slightly longer if designed that way
-
Avoid bulk that adds width to the waist
How to Tie a Bow with Different Dress Materials
Fabric type affects grip, tension, and durability of the bow.
Adjust technique based on material behavior.
-
Slippery fabrics need more control
-
Stiff fabrics need less force
-
Width changes knot stability
Satin, silk, and slippery fabrics
Slippery fabrics loosen easily and require careful tension.
Over-pulling often makes the bow collapse.
-
Tighten gradually
-
Use flatter loops
-
Consider discreet support if needed
Cotton, linen, and stiff materials
Stiffer fabrics hold shape with less effort.
They show creases more clearly.
-
Avoid over-tightening
-
Smooth fabric before final pull
-
Shape loops by hand
Wide sashes vs thin ribbons
Width changes how the knot distributes tension.
Technique must match scale.
-
Wide sashes need flatter knots
-
Thin ribbons need tighter base knots
-
Tail length should match width
How Tight Should a Dress Bow Be?
A dress bow should be snug enough to hold fit without restricting movement.
Comfort is the correct reference point.
-
The dress should stay in place
-
Breathing and movement should feel normal
-
No fabric pulling at seams
Balancing comfort and fit
Comfort indicates proper tension.
Pain or pressure signals over-tightening.
-
Sit and bend slightly to test fit
-
Loosen if fabric digs into the waist
-
Retighten only if the dress shifts
Preventing waist bunching or fabric pull
Bunching means uneven tension.
Correction is simple but necessary.
-
Untie and reset the base knot
-
Smooth fabric before retying
-
Pull both sides evenly
How to Make a Dress Bow Look Even and Polished
A polished bow depends on symmetry and fabric control.
Small adjustments matter more than force.
-
Shape before tightening
-
Adjust after securing
-
Check from multiple angles
Fixing uneven loops
Uneven loops are caused by unequal pulling.
They can be corrected without retying.
-
Pull gently on the smaller loop
-
Ease fabric from the larger loop
-
Rebalance before final tightening
Adjusting bow size and tail length
Proportion affects appearance.
The bow should match the dress scale.
-
Shorten tails if they overpower the dress
-
Enlarge loops for formal styles
-
Keep tails even unless design suggests otherwise
Flattening twists and folds
Twists make bows look messy.
They should be corrected immediately.
-
Untwist fabric before tightening
-
Run fingers along the sash
-
Retie if twists are locked in
How to Keep a Bow from Loosening or Untying
A secure bow relies on knot structure and tension control.
Most failures come from rushed tying.
-
Weak base knots loosen first
-
Slippery fabrics need extra care
-
Movement tests reveal problems early
Proper knot tension techniques
Controlled tightening prevents slippage.
Force should be gradual.
-
Tighten the base knot first
-
Hold tension while forming loops
-
Finish with a gentle final pull
Securing bows for long wear
Extra security may be needed for long events.
Support should stay invisible.
-
Position knot flat against the body
-
Tuck excess fabric neatly
-
Use discreet aids only if necessary
Common Mistakes When Tying a Bow in a Dress
Most issues come from speed, uneven pulling, or poor preparation.
They are easy to avoid with awareness.
-
Rushing the knot
-
Ignoring fabric behavior
-
Skipping final adjustment
Over-tightening the knot
Over-tightening restricts movement and distorts fabric.
It also makes untying harder.
-
Causes waist discomfort
-
Pulls seams out of alignment
-
Flattens bow loops
Unequal loop sizing
Unequal loops break symmetry.
They often result from uneven hand movement.
-
One loop pulled faster than the other
-
Fabric slipping during tightening
-
Lack of final adjustment
Twisted or rolled sashes
Twists lock in poor shape.
They should be fixed before tightening.
-
Occur when fabric is not laid flat
-
More common with long sashes
-
Require retying if set
Tools and Accessories That Help Secure a Dress Bow
Some dresses benefit from subtle support tools.
These should never be visible.
-
Used for slippery fabrics
-
Helpful for long wear
-
Optional, not mandatory
Fashion tape and safety pins
These tools add stability without changing appearance.
They are backup solutions.
-
Tape prevents fabric shift
-
Pins secure hidden areas
-
Use sparingly and discreetly
Built-in loops or hidden fasteners
Some dresses include internal support features.
They are designed to assist bow placement.
-
Keep bows centered
-
Reduce strain on fabric
-
Improve consistency
Bow Tying vs Other Dress-Fastening Methods
Bow tying offers flexibility that fixed fasteners do not.
Each method serves a different purpose.
-
Bows adjust easily
-
Hardware provides rigid closure
-
Choice depends on dress design
Bows vs belts
Belts offer structure, bows offer adjustment.
They change how the dress fits.
-
Belts create fixed waistlines
-
Bows adapt to body movement
-
Bows soften overall look
Bows vs zippers or hooks
Zippers and hooks are mechanical, bows are manual.
This affects ease of use.
-
Zippers close quickly
-
Bows allow custom fit
-
Hooks require precise alignment
Quick Checklist Before Finalizing a Dress Bow
A quick check prevents issues later.
This takes less than a minute.
-
Confirms fit and comfort
-
Ensures visual balance
-
Reduces need for reties
Fit check
The dress should feel secure but comfortable.
Fit comes first.
-
No pinching at the waist
-
Dress stays in place when moving
-
Bow supports, not strains
Visual symmetry check
Symmetry signals proper tying.
It affects overall appearance.
-
Loops match in size
-
Tails align evenly
-
Knot sits centered
Movement and comfort test
Movement reveals hidden problems.
Test before leaving.
-
Sit, walk, and bend slightly
-
Check for loosening
-
Retie if tension shifts
Frequently Asked Questions
How long does it take to tie a bow on a dress properly?
Most bows take less than a minute to tie once you understand the steps. Extra time is usually spent adjusting symmetry and tension for a clean finish.
Why does my dress bow keep slipping or coming loose?
Bows usually loosen due to a weak base knot, slippery fabric, or uneven tension between the two sides of the sash.
Is how to tie a bow in a dress the same for all dress styles?
The basic technique is similar, but placement, fabric type, and sash width require small adjustments depending on the dress design.
Can a dress bow affect how the dress fits my body?
Yes, the bow directly controls waist tension on many dresses, so incorrect tying can cause tightness, bunching, or uneven fit.
Should a dress bow be retied during the day or event?
If tied correctly, a bow should hold for hours, but checking it after sitting or extended movement helps maintain appearance and comfort.